Monday 28 February 2011

Week Five - Foam Latex - Part 1

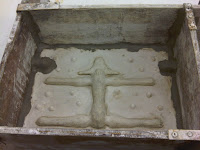
To start with, I had to come up with a way to suspend the armature in the mould so the foam latex could get around the whole thing properly and also didn't touch the sides.

To do this I carefully cut slits into one half of the mould, one on each leg. From this I placed a small piece of 1mm aluminium wire, that the armature would now rest on quite securely, and when both halves of the mould are pressed together the armature won't move a mm.


With the armature ready to go, me and Alex started mixing up a batch of foam latex.

We followed the instructions, to the letter, making a medium/soft density foam mix, which we used for both the fox and badger we did.


After about 15 or so minutes of constant mixing and adding the difference ingredients the foam latex was ready to be put into the mould.

We simple scooped out the foam latex with our hands and filled the mould as full as possible, trying to remove all air bubbles and get the foam latex into every nook and cranny.

I used a small syringe to squirt the foam latex into my fox's ears and nose to avoid any possible air bubbles in these extremities.


With both sides filled and the armature placed carefully into position, both halves of the mould were pushed together and then pressure was applied to them for about 15 minutes (me standing on it) before putting into the kiln at 90oC for about 6 hours.

Week Four - Making the Head

The head for the fox was fairly simple to make, I used a combination of milliput and some wire, which was made from 1mm wire, 4 strands twisted together tightly.


Once the milliput had set, I carefully drilled 8 holes in marked position that would allow me to have moveable ears, fur cheeks and eyebrow that would allow my fox to express some emotion.

The wire was held in place using 5 min epoxy, simple as that.
  

With the head made I could then test fit the whole armature into the mould, to be 100% certain that it would fit, but also leave enough room around the edges for the foam latex. 


Overall I was pleased with the outcome, and to finish the armature off completely I attached some thin steel strips to each foot, crimped, then glued in place with some more expoxy. This will allow my armature to be held to the animation base using magnets.


Week Four - Remaking the Fox Armature

After spending alot of time and effort making a rear nice ball and socket armature for the fox, I decided to abandon it and go with a simple wire frame armature instead.

The reasoning behind this was due to having real difficulties with the joints once heated (like they would be in the mould with foam latex). After a few test of heating the armature for a few hours at 80oC, the same temperature it would be subject to during the foam latex process, some of the joints would stiffen up, while others would loosen. This would result in me having to cut the seams and fiddle with all the joints, which I really didn't want to have to do as it would me alot of work to get foam latex to look neat again.

To make the armature, I used aluminium wire, using two slight different combinations of thickness for different parts of the armature.


 For the spine of the armature I used 5 lengths of 2mm thick wire, twisted together tightly, for the legs I used a combination of 2 strands of 1mm thick wire and 4 strands of 2mm thick wire. This combination would ensure that the legs would be strong enough to take the armature weight, longer lasting and easy to bend.


To make the spine strong, but also easy to bend I doubled up the lengths of 5 stand wire, to essentially give a double spine. This would limit the side to side movement of the fox a little, but would ensure it was strong, yet easy to bend for lateral movements.

I joined the legs to the spine using wraps of 1mm wire, finishing it off with some 5min epoxy which should permanently hold it together.

So I could attach the tail at a later date I fixed a small section of KNS brass tubing, that way I could make the tail separately and simple attach it by pushing it into the KNS.


This was the very basic armature built, not to move onto the head and sorting out a way of allowing the fox to be held to the animation base by magnets.


Friday 11 February 2011

Week Three - Casting up the Fox - Part Four

I came in on Thursday and decided to take the plunge and separate the mould to assess the damage that the catastrophic leak could've potentially done, hoping that everything went well and I wouldn't need to resculpt the Fox, then cast it up again.

To my surprise the mould separated fairly easily (it'll also hold together well, not a wiggle) and upon removing the maquette I was pleased to find that the seams looked ok, a hell of a lot better than my first cast attempt, there were also no air bubbles and only minor sanding/smoothing required on some areas on the body.


 Both sides could a quick clean up, removing all the clay and inspected closer for any damage.


 My main worry was the "fur" on the chest of the Fox and it's head, however to my surprise the head turned out better than anything else. All the surfaces were smooth and free from damage of any sort, not smoothing will be needed and I can just focus on everything else.

 All in all I'm very happy with this phase of the work and I can't wait to get on with the foam latex next week!

Week Three - Casting up the Fox - Part Three

After about 30 mins I pulled the sides off the mould and left the casting to set for a further 30 minutes before carefully removing all of the clay.

With all the clay removed I was left with what you see bellow, the cast of the top half of fox and the remaining half, that I will be cast up now. Luckily when removing the clay the maquette didn't shift once so it's firmly in place and the seams should be pretty good.


The only problem with using clay, is that it transfers very easily onto the plasticine I used to make the maquette. To removed this clay I used a small, soft bristled brush that is slightly damp with clean water. I simply just worked the brush over the surface of the maquette, carefully wetting and removing the clay, giving the results you see in the pictures bellow on one of the rear legs.


 I proceeded to do this with the rest of the maquette, making sure not to touch/change the areas around where the seam will be. I was surprised how well and easy it was to clean up.


With the maquette cleaned up and ready to cast, again, I reattached the sides, making sure this time that I used enough clay on the edges so that the sides won't slip/fall off this time. Using some excess clay I made small raised areas, these would be used as leverage points making it easier to separate the mould once the foam latex is inside.


 I finally coated the whole inside of the mould with soft soap and poured in the plaster.


 After 30 minutes I removed the sides and this how I ended the day on Tuesday, fingers crossed it turns out ok as I've yet to separate the mould to check the casting.

Week Three - Casting up the Fox - Part Two - The Disaster!

With the seam work done I then fitted the sides to the mould to my maquette, filling in all the open gaps around the edges and bottom of the sides with yet more clay. I did this to try and ensure that the plaster, once poured into the mould wouldn't just flood out of the sides, ruining all my hard work and making a mess.


10 minutes or so passed, with no problems what so ever, then all of a sudden one of the sides of the mould split, pouring 7kg's of unset plaster all over the table and floor, resulting in a huge mess.

I didn't take any photo's of the mess as it happened as I was too busy trying to salvage what I could and trying to find out if it would've caused any problems  to my maquette.


This is how the mould looked with all the plaster missing. Luckily, it would seem, all the plaster at the bottom had already set, however I wouldn't know the damage until I'd finished the whole thing, casting up both sides, then I could removed the maquette and check for air bubbles, damage to the seam and finish of the "skin".


Learning from my mistakes I cleaned up the edges of the mould and refitted the sides. Then using loads of left over/scrap clay I rebuild the edges, making them a lot stronger in the hope that they'd hold this time.


Then I mixed up another 7kg's or so of plaster and poured it back into the mould and waited for it to dry. 


Week Three - Casting up the Fox - Part One

I started this week with task of getting the Fox cast up so I could start work with the foam latex in the next week or so.

                                                    
I started out by laying out the fox onto a bed of clay, roughly 1" high. I then began to build up around the outside of the fox with more clay, going roughly half way up the sides of the fox. This would create the two part mould.

                                               
With the clay built up around the edges I then began to carefully push the clay towards the maquette, creating a seam.

                     
The most tricky part of this whole process was making a good seam for around the head of the Fox. It was tricky due to the very small space between the head and the legs of the fox, not mention the height difference, as the head is raised up higher than the body.


After a lot of time and patience the full seam around the Fox was complete. To finish it up and ensure the seam was a good as possible I went round the whole thing with a very fine, soft bristled paint brush.


Using very small amounts of water and light pressure this cleaned up the seam nicely and ensured it was tight up close to the maquette without leaving any marks in the surface of the plasticine.


Now it's time to start mixing the plaster.